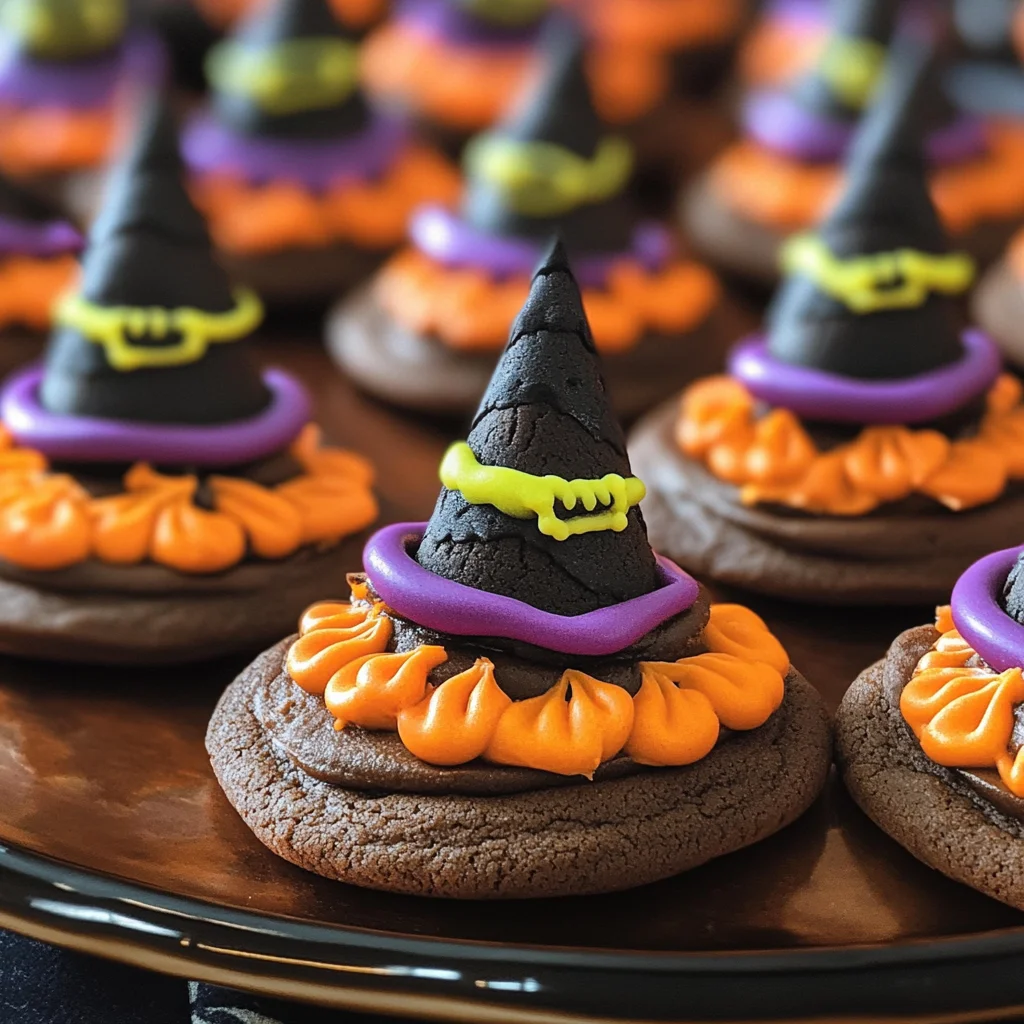
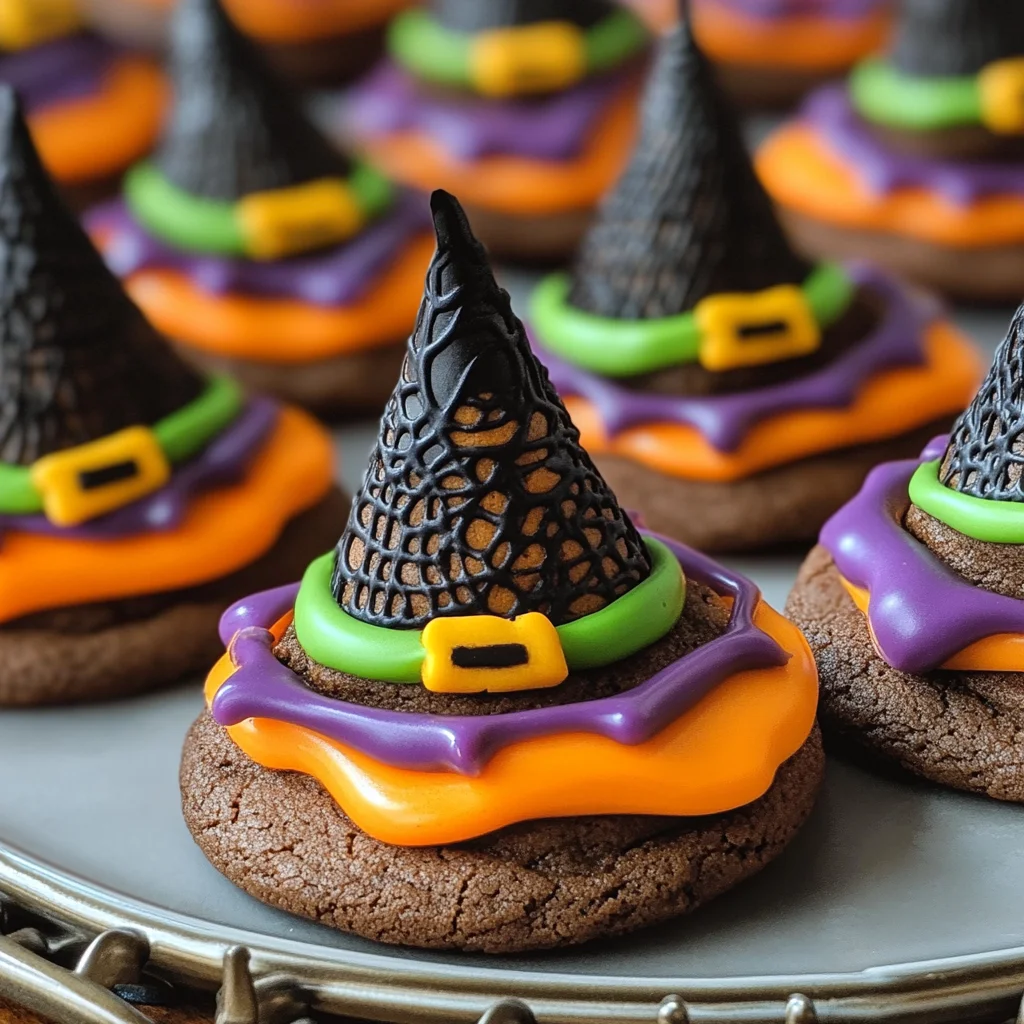
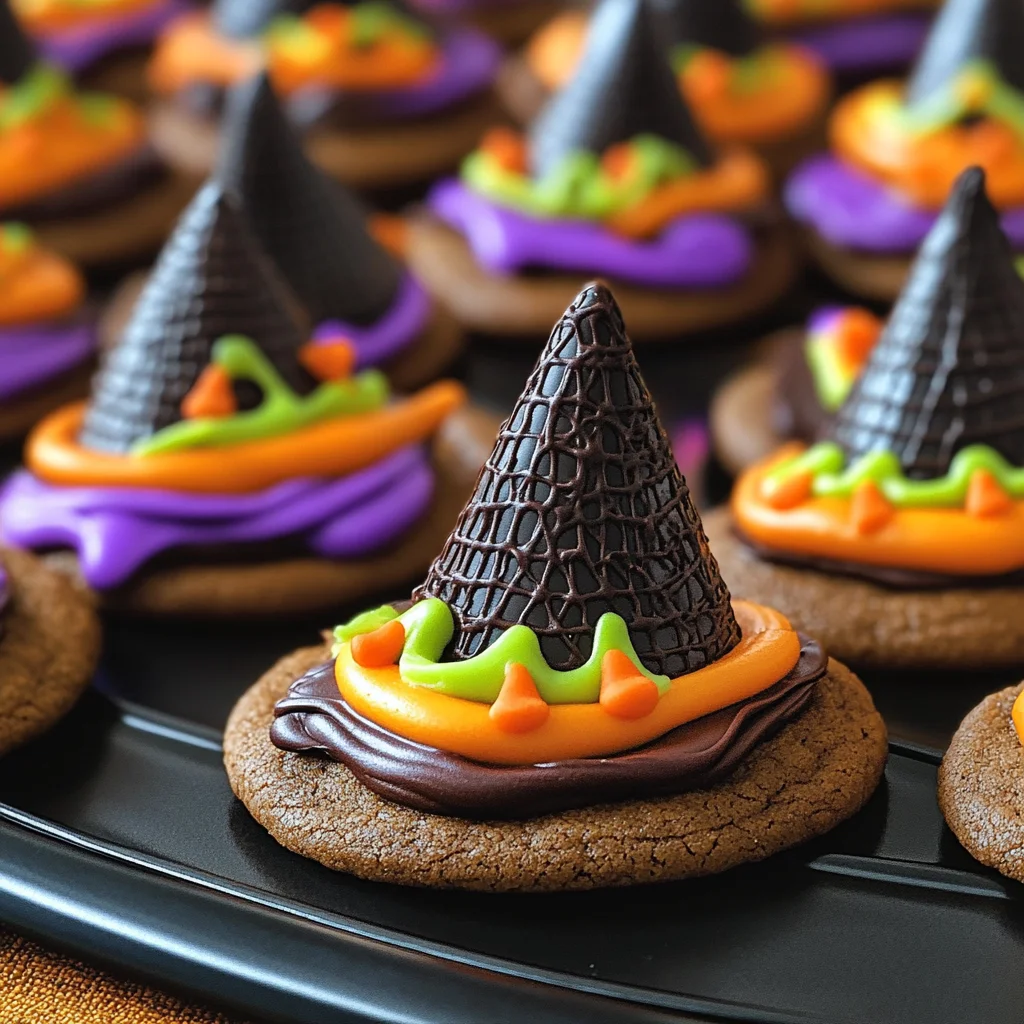
These Halloween Witch Hat Cookies are a delightful treat that will charm your guests at any Halloween gathering. Not only are they visually striking, but they also offer a fun baking project to enjoy with kids. With their chocolaty goodness and customizable decorations, these cookies will enchant both young and old alike, making them perfect for parties, classroom treats, or festive family gatherings.
Why You’ll Love This Recipe
- Easy to Make: With simple ingredients and straightforward instructions, these cookies are accessible for bakers of all skill levels.
- Customizable Designs: Get creative with colors and decorations! Let your imagination run wild when it comes to icing designs.
- Fun for Kids: Involve the little ones in the decorating process; they’ll love piping the icing and assembling their witch hats!
- Perfect for Parties: These cookies not only taste great but also look festive on any Halloween dessert table.
- Delicious Flavor: The combination of chocolate cookies and creamy icing creates a rich treat that everyone will enjoy.
Tools and Preparation
To create these fantastic Halloween Witch Hat Cookies, you’ll need some essential tools to make the process smooth and enjoyable.
Essential Tools and Equipment
- Cupcake Cones Baking Rack
- Baking Sheet
- Parchment Paper
- Decorating Bags
- Icing Tips (2B and 3)
- Knife for Trimming
Importance of Each Tool
- Cupcake Cones Baking Rack: This rack holds the sugar cones upright while baking, ensuring even cooking and stability.
- Baking Sheet: A sturdy baking sheet provides a solid foundation for your cones during baking.
- Piping Bags: Using decorating bags allows you to easily control the flow of icing for neat designs.
Ingredients
Here’s what you’ll need to make these delightful Halloween Witch Hat Cookies:
- Favorite Cake Mix or Try Wilton’s Chocolate Cake Recipe
- Store Bought Chocolate Cookies or Try This Recipe from Wilton
- Lemon Yellow Icing Color
- Black Color Mist Food Coloring Spray
- Rose Icing Colors Pink Food Coloring
- Violet Icing Color, Gel Food Coloring
- Golden Yellow Icing Color
- Orange Icing Color
- Sugar Cones
- Creamy White Decorator Icing, 4 lb. Tub
How to Make Halloween Witch Hat Cookies
Step 1: Prepare & Bake the Cones
- Prepare the cake mix according to the chosen recipe’s instructions.
- Place the Cupcake Cones Baking Rack on the cookie sheet.
- Insert sugar cones into the rack.
- Fill each cone with 2 tablespoons of cake batter.
- Bake according to the timing instructions from your recipe and let them cool afterward.
Step 2: Spray the Cones
- If necessary, trim any risen cake from the top of the cones using a knife.
- Place cones wide side down on parchment paper.
- Use Black Color Mist spray to coat each cone evenly and let them dry for about 10 to 15 minutes.
Step 3: Tint the Icing & Prepare the Bags
- Tint 1 cup of creamy white decorator icing orange.
- For purple icing, combine violet and rose icing colors in another cup until you reach desired color.
- Prepare two decorating bags with tip 2B; fill one with orange icing and another with purple icing.
- Tint ¼ cup of creamy white decorator icing yellow by mixing golden yellow and lemon yellow colors; place in a bag with tip 3 attached.
Step 4: Assemble the Witch Hats
- Pipe a small amount of orange icing in the middle of a cookie; place a cone on top.
- Use tip 2B to pipe a band around half of the cones’ wide ends; smooth it with a spatula.
- Repeat this process using purple icing on the remaining cookies and cones.
- Allow them to set for about 15 to 20 minutes before piping yellow tinted icing around the bands as buckles.
- Let everything set again for another 15 to 20 minutes before serving your stunning Halloween Witch Hat Cookies!
How to Serve Halloween Witch Hat Cookies
These delightful Halloween Witch Hat Cookies are not only a treat for the eyes but also for the taste buds. Here are some creative ideas for serving these spooky sweets at your next Halloween gathering.
Individual Treat Bags
- Use small, clear treat bags to package single cookies for guests. Tie with orange ribbon for an extra festive touch.
Halloween Dessert Table
- Create a themed dessert table featuring these cookies alongside other Halloween treats like cupcakes and candy corn. This visually appealing setup will impress your guests.
Cookie Decorating Station
- Set up a cookie decorating station where kids can add their own edible decorations to the witch hats. Provide sprinkles and different icing colors for added fun.
Party Favors
- Send guests home with a cookie as a party favor. Include a cute tag with the recipe or a spooky message to keep the Halloween spirit alive.
Milk Pairing
- Serve with cold milk or a Halloween-themed drink like pumpkin spice latte or apple cider. This classic combination will be a hit among both kids and adults.
How to Perfect Halloween Witch Hat Cookies
Making these cookies is easy, but following some tips can elevate them to perfection.
- Use High-Quality Ingredients: Opt for fresh and high-quality cake mix and icing for better flavor.
- Make It Colorful: Don’t shy away from using vibrant food coloring to make your cookies stand out on the dessert table.
- Chill Icing: If you find your icing too runny, chill it in the fridge for 10 minutes before piping. This helps achieve cleaner lines.
- Practice Piping: Before decorating, practice piping on parchment paper. This will help you get comfortable with the technique.
- Allow Dry Time: Be patient and let the decorated cookies dry completely before stacking them to prevent smudging.
Best Side Dishes for Halloween Witch Hat Cookies
Pair these whimsical cookies with equally festive side dishes to create a well-rounded Halloween spread. Here are some tasty options:
- Pumpkin Soup: A warm and creamy soup that complements the flavors of fall, perfect as a starter.
- Witch’s Brew Punch: A fun, spooky drink made with green sherbet and lemon-lime soda that adds flair to your table.
- Mummy Hot Dogs: Wrap hot dogs in crescent dough to resemble mummies; they’re sure to be a crowd favorite.
- Spooky Cheese Platter: Arrange assorted cheeses and crackers along with seasonal fruits like grapes or figs for an elegant touch.
- Ghostly Mashed Potatoes: Shape mashed potatoes into ghostly figures using olives for eyes; this playful dish will delight guests of all ages.
- Cauldron Chili: A hearty chili served in mini cauldrons (or bowls) provides warmth and flavor, perfect for fall gatherings.
- Monster Veggie Tray: Create a colorful veggie tray arranged like monsters using dips as pools of slime!
- Candy Corn Fruit Cups: Layer fruits like pineapple, mango, and whipped cream in cups mimicking candy corn colors for a sweet treat option.
Common Mistakes to Avoid
Making Halloween Witch Hat Cookies can be a fun and enjoyable experience, but certain common mistakes can hinder your success.
- Skipping the cooling step: Always allow your cake cones to cool completely before decorating. This prevents the icing from melting and ensures that your decorations stay in place.
- Overfilling the cones: It may be tempting to fill the sugar cones to the brim, but using too much batter can lead to overflowing. Stick to 2 tablespoons for best results.
- Not letting the color mist dry: After spraying the cones with Black Color Mist, wait for at least 10-15 minutes for them to dry. Rushing this step can make the icing slide off.
- Ignoring icing consistency: If your icing is too thick or thin, it won’t pipe well. Adjust with a little water or powdered sugar until you reach a smooth, pipeable consistency.
- Forgetting about decoration timing: Let each layer of icing set before adding more decorations. This helps keep everything neat and prevents colors from blending unintentionally.
Storage & Reheating Instructions
Refrigerator Storage
- Store Halloween Witch Hat Cookies in an airtight container.
- They will maintain their quality for up to 3 days in the fridge.
Freezing Halloween Witch Hat Cookies
- Wrap each cookie individually in plastic wrap and then place them in a freezer-safe container.
- Frozen cookies can last up to 2 months without losing flavor.
Reheating Halloween Witch Hat Cookies
- Oven: Preheat your oven to 350°F (175°C). Place cookies on a baking sheet for about 5–7 minutes until warm.
- Microwave: Heat cookies individually on a microwave-safe plate for 10-15 seconds. Be careful not to overheat as they can become tough.
- Stovetop: Cover cookies with a lid on medium-low heat for about 2-3 minutes to warm through gently.
Frequently Asked Questions
Here are some common questions about making Halloween Witch Hat Cookies.
What are Halloween Witch Hat Cookies?
Halloween Witch Hat Cookies are fun, festive treats made with chocolate cookies topped with cake-filled sugar cones, decorated like witch hats.
Can I customize my Halloween Witch Hat Cookies?
Absolutely! Feel free to use different colors of icing or add sprinkles and edible glitter for extra flair. Personalize them to match your party theme!
How do I store leftover Halloween Witch Hat Cookies?
Store any leftover cookies in an airtight container at room temperature for up to three days or refrigerate them for longer freshness.
Can I use homemade cookies instead of store-bought ones?
Yes! You can bake your favorite chocolate cookie recipe instead of using store-bought cookies for this treat.
Final Thoughts
These Halloween Witch Hat Cookies are not only delightful but also versatile. With endless customization options, you can create unique treats that fit any spooky celebration. Try making them with friends or family for a fun-filled baking activity this Halloween season!

Halloween Witch Hat Cookies
- Total Time: 50 minutes
- Yield: Approximately 12 cookies
Description
Halloween Witch Hat Cookies are the ultimate festive treat for your spooky celebrations! These whimsical cookies combine chocolate cookie bases topped with cake-filled sugar cones, creating a delightful witch hat shape. Not only are they visually striking, but they also offer endless opportunities for creativity with colorful icing and decorations. Perfect for Halloween parties, school treats, or family gatherings, these cookies will enchant guests of all ages. Get ready to whip up a batch that’s as fun to make as it is to eat!
Ingredients
- Chocolate cookie base (store-bought or homemade)
- Sugar cones
- Creamy white decorator icing (4 lb. tub)
- Food colorings (orange, yellow, violet, black)
- Favorite cake mix
Instructions
- Preheat the oven and prepare cake mix according to package instructions.
- Insert sugar cones into a cupcake cone baking rack; fill each cone with 2 tablespoons of cake batter and bake until done.
- After cooling, spray cones with black color mist; let dry.
- Tint decorator icing with desired colors and fill piping bags.
- Pipe orange icing on cookies, attach cones, and decorate as desired with colored icing.
- Prep Time: 30 minutes
- Cook Time: 20 minutes
- Category: Dessert
- Method: Baking
- Cuisine: American
Nutrition
- Serving Size: 1 cookie (50g)
- Calories: 210
- Sugar: 18g
- Sodium: 150mg
- Fat: 10g
- Saturated Fat: 3g
- Unsaturated Fat: 7g
- Trans Fat: 0g
- Carbohydrates: 30g
- Fiber: 1g
- Protein: 2g
- Cholesterol: 15mg
Keywords: Use high-quality ingredients for the best flavor. Chill the icing if it's too runny for cleaner piping. Consider adding sprinkles or edible glitter for extra flair.