
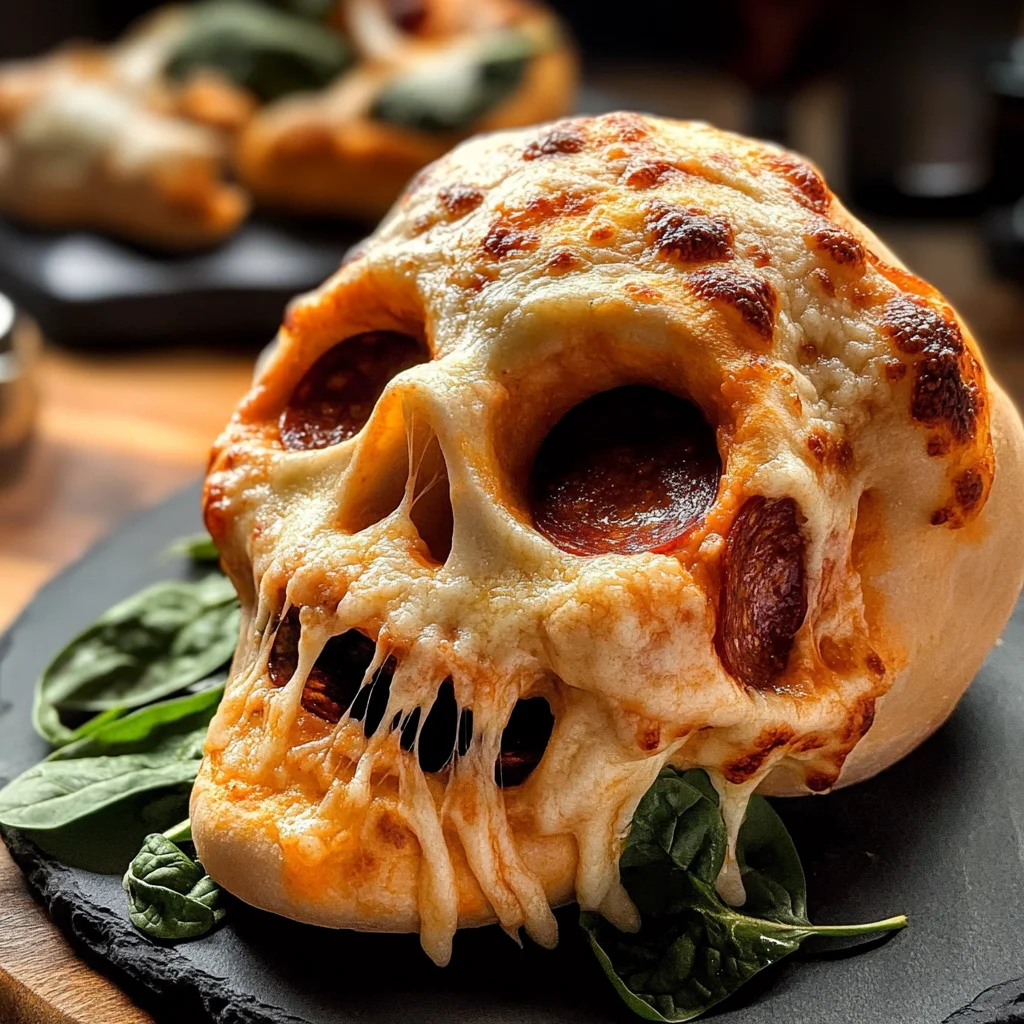
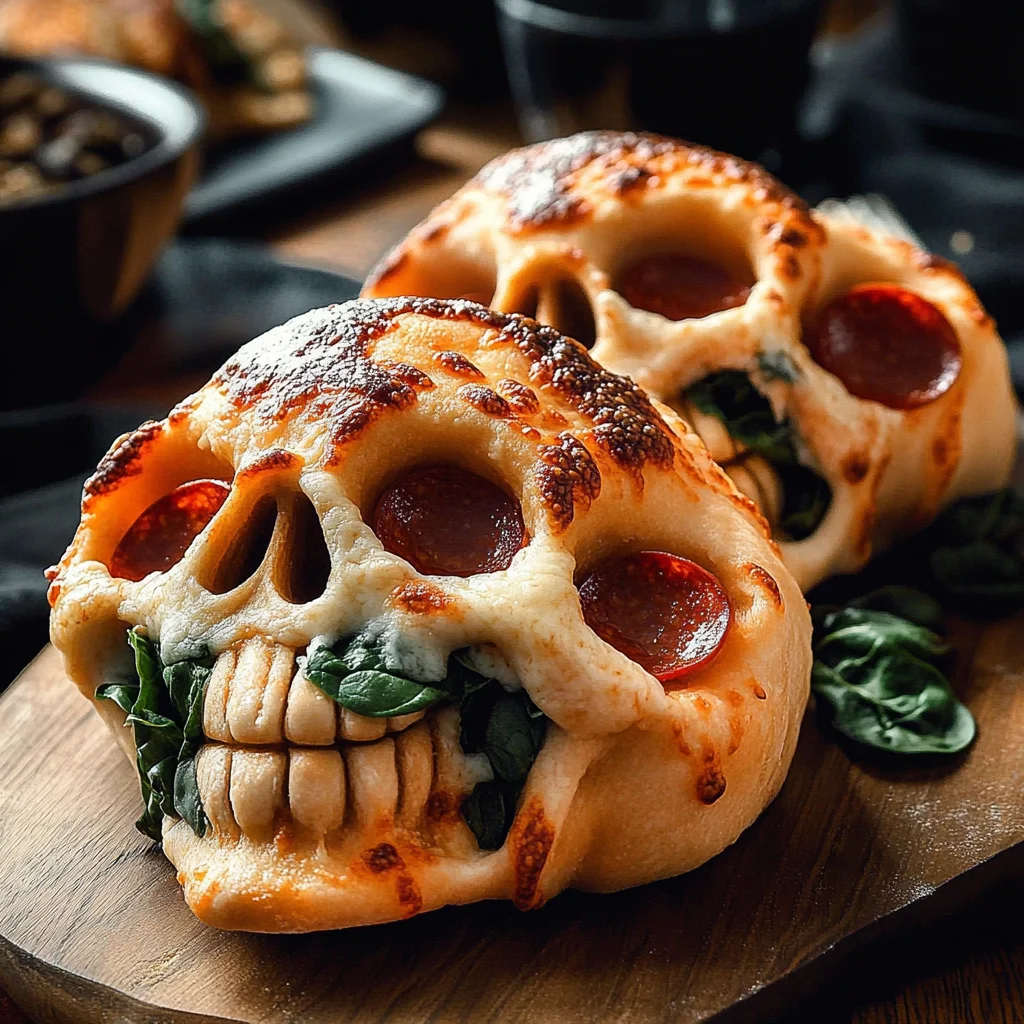
These Cheesy Halloween Pizza Skulls are sure to be a hit at your next gathering! Perfect for Halloween parties or cozy family dinners, this fun and spooky recipe combines cheesy goodness with playful presentation. Not only are they easy to make, but you can also customize the fillings to suit your taste. Get ready for a deliciously eerie treat that kids and adults alike will love!
Why You’ll Love This Recipe
- Fun Presentation: These pizza skulls bring a playful twist to your dinner table, making them ideal for Halloween celebrations.
- Customizable Fillings: Use your favorite toppings, from turkey pepperoni to vegetables, ensuring everyone gets a bite they enjoy.
- Simple Preparation: With pre-made pizza dough, these treats come together quickly—perfect for busy weeknights or last-minute party planning.
- Delicious Flavor: The combination of melted mozzarella and savory toppings creates a flavor-packed bite that’s hard to resist.
- Great for Sharing: Serve these delightful skulls as appetizers or snacks at parties; they’re perfect for sharing and enjoying with friends.
Tools and Preparation
To create these Cheesy Halloween Pizza Skulls, you’ll need a few essential tools. Having the right equipment makes the process smoother and more enjoyable.
Essential Tools and Equipment
- Mini skull baking tin
- Rolling pin
- Cooking spray
- Knife or pizza cutter
- Mixing bowl
Importance of Each Tool
- Mini skull baking tin: This unique shape adds a fun Halloween theme to your pizza skulls, making them visually appealing.
- Rolling pin: Essential for easily shaping your pizza dough to the right thickness without tearing it.
- Cooking spray: Prevents sticking, ensuring your pizza skulls come out of the tin smoothly after baking.
Ingredients
For these Cheesy Halloween Pizza Skulls, gather the following ingredients:
Dough and Sauce
- 13 to 16 ounces of pre-made pizza dough
- 3/4 to 1 cup pizza sauce
Cheese
- 2 cups shredded mozzarella
- Parmesan cheese (about 1/4 cup)
Toppings
- Cooked sausage (about 8 ounces for 6 pizza skulls)
- Mini turkey pepperoni (about 6 ounces for 6 pizza skulls)
- Black olives (sliced)
- Sliced chicken ham (chopped)
- Crumble crispy turkey bacon
- Mini Italian meatballs
- Cooked corn kernels
- Baby spinach
- Fresh basil
Dipping Sauce
- Marinara sauce for dipping
- Chopped parsley or basil
How to Make Cheesy Halloween Pizza Skulls
Step 1: Prepare Your Baking Tin
Spray the mini skull baking tin with cooking spray. This ensures easy removal of your tasty creations after baking.
Step 2: Roll Out the Dough
Dust the counter lightly with flour to prevent sticking. Roll, pat, or stretch the dough until it is about 1/4 thick. Cut the dough into six rectangles. Don’t worry about perfection—each piece can have its own quirky shape!
Step 3: Fill the Skull Cavities
Take one piece of dough at a time and lay it into each skull cavity. Start layering with sauce, mozzarella cheese, Parmesan, and your chosen toppings. After adding toppings, drizzle a small amount of pizza sauce on top before sealing.
Step 4: Seal the Dough
Fold the dough over the fillings, pinching it together to seal like a mini pizza pocket. Repeat this process until all six pieces are filled and sealed.
Step 5: Refrigerate While Preheating
Place the filled tray in the refrigerator while you preheat your oven.
Step 6: Preheat Your Oven
Preheat the oven to 400 degrees Fahrenheit so it’s ready when you’re finished assembling.
Step 7: Bake Your Pizza Skulls
Remove the tray from the refrigerator and bake for about 16 to 20 minutes or until lightly golden brown. Keep an eye on them as baking times may vary based on your dough brand.
Step 8: Cool and Serve
Once baked, let them cool for five minutes before gently unmolding. Serve warm with marinara sauce and garnish with chopped parsley or basil if desired.
Enjoy making these delightful Cheesy Halloween Pizza Skulls!
How to Serve Cheesy Halloween Pizza Skulls
These Cheesy Halloween Pizza Skulls are not just delicious; they are also perfect for a fun Halloween gathering. You can elevate the serving experience with a few creative ideas that will impress your guests.
Fun Presentation Ideas
- Spooky Platter: Arrange the pizza skulls on a black platter, adding some fake spider webs or plastic spiders for an eerie touch.
- Mummy Wraps: Serve the pizza skulls with strips of cheese wrapped around them to resemble mummies.
- Garnished Dipping Station: Create a dipping station with marinara sauce, ranch dressing, and guacamole, garnished with chopped herbs and vegetables.
Themed Drinks
- Witch’s Brew: Offer a green punch made from lime soda and sherbet for a fun drink pairing.
- Monster Smoothies: Blend spinach, banana, and yogurt for a nutritious green smoothie that kids will love.
Accompanying Treats
- Pumpkin Veggies: Serve orange bell peppers and carrot sticks cut into pumpkin shapes for a healthy snack alongside.
- Ghostly Fruit: Use bananas and chocolate chips to create ghost-shaped fruit snacks that complement your spooky theme.
How to Perfect Cheesy Halloween Pizza Skulls
Making the perfect Cheesy Halloween Pizza Skulls is all about attention to detail. Here are some tips to ensure your pizza skulls come out fantastic every time.
- Bold Flavors: Experiment with different toppings like jalapeños or artichokes to add depth to the flavor profile.
- Even Sealing: Ensure you pinch the dough tightly around the edges to prevent any filling from leaking during baking.
- Oven Thermometer Check: Always check your oven temperature with a thermometer; accurate heat is crucial for perfect cooking.
- Dough Resting Time: Let the dough rest for 5-10 minutes before rolling it out; this makes it more manageable and easier to shape.
Best Side Dishes for Cheesy Halloween Pizza Skulls
Complementing your Cheesy Halloween Pizza Skulls with the right side dishes can enhance your meal. Here are some great options to consider.
- Garlic Breadsticks: Soft breadsticks brushed with garlic butter make a delightful pairing.
- Crispy Salad: A fresh salad with mixed greens, cucumbers, and cherry tomatoes adds a refreshing crunch.
- Stuffed Jalapeños: Spicy stuffed jalapeños offer an exciting kick that pairs well with cheesy flavors.
- Roasted Vegetables: Seasonal roasted veggies like carrots and zucchini provide color and nutrition to your plate.
- Cheesy Nachos: Crunchy tortilla chips topped with melted cheese and jalapeños make for an irresistible snack.
- Mini Corn Dogs: Bite-sized corn dogs are always a crowd-pleaser and add some fun to your Halloween spread.
- Sweet Potato Fries: Crispy sweet potato fries provide a sweet contrast to the savory pizza skulls.
- Fruit Salad Cups: Individual cups of mixed fruit bring sweetness and balance out the meal beautifully.
Common Mistakes to Avoid
When making Cheesy Halloween Pizza Skulls, it’s easy to overlook some key details. Here are common mistakes and how to avoid them.
- Skipping dough prep: Not rolling out the dough properly can lead to uneven cooking. Ensure the dough is at least 1/4 thick for even baking.
- Overstuffing the skulls: While it’s tempting to add a lot of toppings, overstuffing can cause spills and uneven cooking. Limit fillings to avoid this issue.
- Neglecting to seal properly: If the dough isn’t sealed well, the fillings can leak during baking. Pinch the edges securely to keep everything in place.
- Ignoring oven temperature: Baking at too low a temperature can result in soggy pizza skulls. Preheat your oven to 400°F for the best results.
- Forgetting about cooling time: Cutting into the pizza skulls immediately after baking can lead to burns. Allow them to cool for 5 minutes before serving.
Storage & Reheating Instructions
Refrigerator Storage
- Store leftover Cheesy Halloween Pizza Skulls in an airtight container.
- They will last up to 3 days in the refrigerator.
Freezing Cheesy Halloween Pizza Skulls
- Freeze completely cooled pizza skulls in a freezer-safe container or zip-top bag.
- They can be stored for up to 2 months.
Reheating Cheesy Halloween Pizza Skulls
- Oven: Preheat your oven to 350°F and bake for about 10–15 minutes until heated through.
- Microwave: Heat on medium power for 1–2 minutes, checking frequently to avoid sogginess.
- Stovetop: Place them in a skillet over low heat, flipping occasionally until warmed throughout.
Frequently Asked Questions
Here are some common questions about making Cheesy Halloween Pizza Skulls.
Can I customize the toppings in Cheesy Halloween Pizza Skulls?
Absolutely! Feel free to use your favorite toppings like vegetables, different cheeses, or meats such as turkey pepperoni.
How do I prevent my pizza skulls from leaking?
Make sure to seal the edges of your dough well by pinching tightly and avoiding overfilling with sauce or toppings.
What type of cheese works best for Cheesy Halloween Pizza Skulls?
Mozzarella is ideal for its melting properties, but you can also mix in cheddar or provolone for added flavor.
How long does it take to make Cheesy Halloween Pizza Skulls?
The total time is about 30 minutes, including preparation and baking. It’s a quick and fun recipe!
Final Thoughts
Cheesy Halloween Pizza Skulls are not only an exciting treat for Halloween but also versatile enough for any occasion. You can easily customize these savory snacks with various ingredients that suit your tastes. Try them out at your next gathering or as a fun dinner option!

Cheesy Halloween Pizza Skulls
- Total Time: 35 minutes
- Yield: Serves 6
Description
Get ready to impress your guests with these Cheesy Halloween Pizza Skulls! This playful and delicious recipe is perfect for Halloween parties or family gatherings. Made with customizable fillings and a fun skull shape, these savory snacks are sure to delight both kids and adults alike. With melted mozzarella and a variety of tasty toppings, each bite offers cheesy goodness that’s impossible to resist. Whether served as appetizers or part of a festive dinner, these pizza skulls will add a spooky twist to your table. Easy to prepare and fun to eat, they are a must-try for your next celebration!
Ingredients
- 13 to 16 ounces of pre-made pizza dough
- 3/4 to 1 cup pizza sauce
- 2 cups shredded mozzarella cheese
- 1/4 cup Parmesan cheese
- Cooked turkey sausage or turkey pepperoni (8 ounces)
- Sliced black olives
- Chopped cooked chicken
- Crumble crispy turkey bacon
- Mini Italian meatballs
- Fresh spinach
Instructions
- Preheat the oven to 400°F and spray a mini skull baking tin with cooking spray.
- Roll out the pizza dough on a lightly floured surface until about 1/4 inch thick; cut into six rectangles.
- Place each piece of dough into the skull cavities, layering with sauce, mozzarella, Parmesan, and selected toppings.
- Fold the dough over the fillings and pinch edges to seal securely.
- Refrigerate the filled tin while the oven preheats.
- Bake for 16 to 20 minutes until golden brown. Let cool for five minutes before unmolding.
- Prep Time: 15 minutes
- Cook Time: 20 minutes
- Category: Appetizer
- Method: Baking
- Cuisine: American
Nutrition
- Serving Size: 1 serving
- Calories: 250
- Sugar: 3g
- Sodium: 610mg
- Fat: 11g
- Saturated Fat: 5g
- Unsaturated Fat: 5g
- Trans Fat: 0g
- Carbohydrates: 28g
- Fiber: 2g
- Protein: 12g
- Cholesterol: 35mg
Keywords: Feel free to mix up the toppings based on your preferences; any favorite vegetables or meats work well. Ensure the dough is sealed tightly around the edges to prevent leaks during baking.